Hello Guest

Removed my bumper cover and found a nightmare! - Update & more pics

  • 20 Replies
  • 13579 Views

0 Members and 1 Guest are viewing this topic.

*

Offline hegemon

  • 112
  • 4
  • Gender: Male
Greeting,
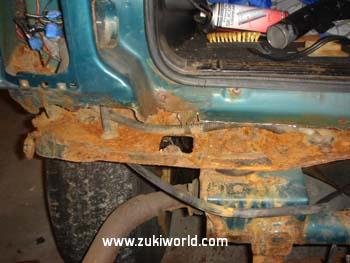
Well the nightmare started a little bit earlier, I was under the tracker (2dr - 1996), and found that my second to last cross member was gone, completely!  Which included my front gas tank mounts, and a few other items, so I figured, okay drop the tank, and weld in some new tubing. Well when I removed the bumper cover, I uncovered a plethora of rust.  Here are some pics and some questions I'd like to get your opinions on.

Here's the cross member cleaned up, still need to grind it down to get some clean metal to weld on.  Trying to decide if I should weld some small flat plates to the end of the new tube, and weld the plates to the frame, or try and drill out the existing holes, and run the tube all the way through the existing frame and re-weld the shock tower mounts to it?
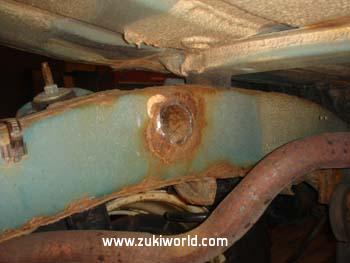
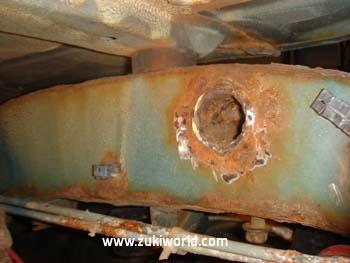
 

Next is the rear of the body, most of which is rotted out, luckily below the tail lights, so the repairs shouldn't affect the appearance of the track kick.

Passenger Side
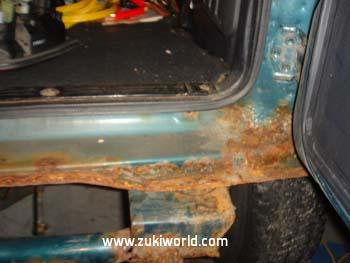
 

Driver Side
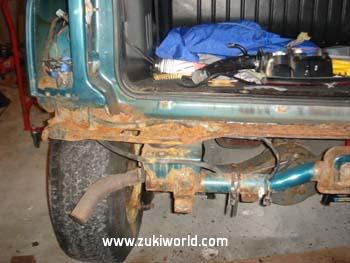
 

Rear Body Mount - The bottom plate that mounts to the frame still seems solid, it's really rusty, but maybe salvageable, won't know until I grind it down.


Rear Cross member -this should be an easy enough fix, going to cut out the existing tube and replace it with some straight tube.
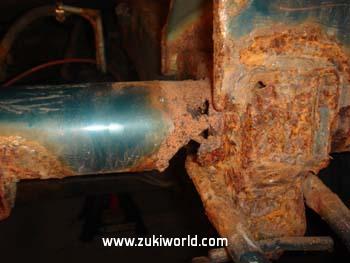


Probably would be easier to find a doner tracker, but can't find anything under $800 in my area, I had some dom tubing around so no cost there, so my costs should just be from the sheet metal needed to repair the rear.  Was thinking about cutting it out clean and simply welding in some rectangle tube 2X4 or something like that.  
« Last Edit: March 02, 2010, 09:35:45 AM by hegemon »

*

Offline wildgoody

  • *
  • 8134
  • 67
  • Gender: Male
  • Turbocharged 150HP 1.6L 8V 93MPH 1/4 mile
Re: Removed my bumper cover and found a nightmare!
« Reply #1 on: October 27, 2009, 08:38:04 AM »
Poor trucklet, looks bad, I would start with a sandblast, harbor freight has them cheep, works
the compressor hard but cleans all the crap up and wont take more than you need to like grinding
would. Then I would get out the rust convertor, I got mine at Autozone or Wal-Mart in the body
filler area in auto. spray the crap out of it, and it turns the rust to a black oxide, kind of like a blue finish
on a gun, then you can paint it, or better yet spray it with a tough coating like undercoating or
a bedliner product to protect it from further rusting. (do the convertor and sprays after all welding is done)

You could also try to find "creeping oil" it's used in inaccessible places in aircraft to prevent corrosion, shoot
it into the tubes of your frame and other spots you know get water and road spray splashed in

look at these guys for the corrosion inhibitor

http://www.aircraftspruce.com/catalog/cspages/crccorrosion.php

http://www.aircraftspruce.com/catalog/cspages/lpsproducts.php


This will save the frame for a while, and give you some time to get a replacement

Good Luck
Wild
Real Trucks Are Built, Not Bought,
And Chrome Don't Get Ya Home.  

An armed man is a citizen. An unarmed man is a subject.

*

Offline heiney.5

  • *
  • 175
  • 9
  • Gender: Male
Re: Removed my bumper cover and found a nightmare!
« Reply #2 on: October 27, 2009, 09:19:04 AM »
oh the rust....I had a similar scenario when I first dug into my trackick. But look on the bright side...this makes for a good reason to lift the tank, which is an excellent way to get better departure angles. I guess that would require a body lift though and different tires, so maybe not so practical....

Anyways, I agree with wildgoody a cheap sandblast goes a long ways. That product he recommended looks nice too.

You may also look into a product called "Chassis Saver." I used it on a few different applications (incl. by trackick) and have had good luck with it. Basically its a brush(or spray if you choose) on "rust converter", kinda like por 15, but seems to work better then it on frames. All I did was sandblast my frame and wire brush certain areas then brush on this stuff.

http://www.magnetpaints.com/underbody.asp
Difficult takes a day. Impossible takes a week.

*

Offline hegemon

  • 112
  • 4
  • Gender: Male
Re: Removed my bumper cover and found a nightmare!
« Reply #3 on: October 27, 2009, 09:29:24 AM »
Thanks,
I actually have access to a sand blaster, I'll give that a whirl.  I'm hoping I can get a way with the rust converter on the bottom plate that mounts the body to the frame. 

Quote
this makes for a good reason to lift the tank, which is an excellent way to get better departure angles. I guess that would require a body lift though and different tires, so maybe not so practical....

A body lift is definite, just need to figure out the best way to mount the tank to the new cross member once I get it in. 

Anyone have pics of their tank lifted?

*

Offline heiney.5

  • *
  • 175
  • 9
  • Gender: Male
Re: Removed my bumper cover and found a nightmare!
« Reply #4 on: October 27, 2009, 09:52:38 AM »
A good article on the tank lift is found here:

http://www.zukiworld.com/month_080102/feature_hagen_gastanklift.htm

I think there are some post on it also, but dont have them handy... One catch is the tank may interfere with the rear crossmember slightly. Some ppl cut it out and put a solid pipe in its place, but I think Hagen just takes a hammer and bents the lip or puts a small "dint" in the tank to make it clear.
Difficult takes a day. Impossible takes a week.

*

Offline wildgoody

  • *
  • 8134
  • 67
  • Gender: Male
  • Turbocharged 150HP 1.6L 8V 93MPH 1/4 mile
Re: Removed my bumper cover and found a nightmare!
« Reply #5 on: October 27, 2009, 12:35:51 PM »
That Chassis Saver looks like an awesome product, I think I would use
that instead of undercoating.

Wild
Real Trucks Are Built, Not Bought,
And Chrome Don't Get Ya Home.  

An armed man is a citizen. An unarmed man is a subject.

*

Offline hegemon

  • 112
  • 4
  • Gender: Male
Re: Removed my bumper cover and found a nightmare!
« Reply #6 on: November 09, 2009, 10:35:22 AM »
I installed a 3" body lift using 3X3X3 3/16 square tubing.  Pretty easy job, except that I had to drill out the front and back body mounts,  at least none of the side ones broke! 

I installed the BL for a couple reasons, first it would make repairing the frame a little easier with the body out of the way; second I can lift the gas tank when it's time to reinstall, and third a little more room for bigger tires never hurt.

Everything went well, but I was wondering - reading on the forum, I was pretty sure I was going to have to adjust/extend the steering.  I loosened both ends before lifting it, but honestly it doesn't look like it moved, I was expecting it to pull from the splines a bit, but I don't see any change.

My tracker is a 96 2dr, anyone else not have to change the steering, or am I missing something here?

*

Offline wildgoody

  • *
  • 8134
  • 67
  • Gender: Male
  • Turbocharged 150HP 1.6L 8V 93MPH 1/4 mile
Re: Removed my bumper cover and found a nightmare!
« Reply #7 on: November 10, 2009, 09:57:30 AM »
I had to extend mine, but I'm lifted 4"

Wild
Real Trucks Are Built, Not Bought,
And Chrome Don't Get Ya Home.  

An armed man is a citizen. An unarmed man is a subject.

*

Offline hegemon

  • 112
  • 4
  • Gender: Male
Re: Removed my bumper cover and found a nightmare! Updated with progress
« Reply #8 on: November 16, 2009, 08:32:57 AM »
Okay, so body lift is now completely installed, extended the shifters, made some 3.5" body spacers, and welded one of replacement cross members.

Front Body Block - The front bolts had snapped off, so I had to drill them out and replace with 3.5" long bolts:


Side Mount:


Body Spacers: These are currently set with black rtv, but I will probably hit them with a tack weld just to be sure they stay in place.


Extended Shifters: - I used an old tire iron for the metal


and finally the rear cross member: Laying under neath trying to weld the back side or I guess front side of the cross member was pretty scary, I'll probably go back with a mirror and make sure the welds are good.


Now it's on to fix the the last cross member and the rusted out body section.

*

Offline hegemon

  • 112
  • 4
  • Gender: Male
Re: Removed my bumper cover and found a nightmare! - additional progress
« Reply #9 on: December 14, 2009, 09:08:32 AM »
It's hard finding time to work on the tracker, but I've made a little more progress.  I cut proximately the last foot off of the rear frame and rebuilt it with some 2X3 1/8th" steel stock, and some additional dom tubing my brother had laying around.  Here are some pics of the process.  Up next will the be the nightmare portion of fixing the rear body section.

Mock-up of the rear frame replacement position.  Needed to be sure the gas tank would fit correctly.  Note I will be lifting the tank, not sure if I will do it as described in the Hagen article (i.e. drilling through the frame cross tubes) or if I'll weld on some bolts, not sure yet.


Here it is welded in place:


A close up of the initial frame rail welds


Welded in 1/4" plates for strength, these plates were conveniently provided by my father, they are actually boiler plates, so they came pre-drilled with some holes.


I had to rebuild the rear body mounts, basically anything in contact with the original frame section was rotted, so I removed any bad metal, and welded in new metal.


And here's the body mount mocked in place.  I just need to reattach to the frame paint it all up, and it done.


*

Offline hegemon

  • 112
  • 4
  • Gender: Male
Re: Removed my bumper cover and found a nightmare! - Some progress & more pics
« Reply #10 on: December 15, 2009, 04:44:27 PM »
Quick question, when I dropped my gas tank, naturally one of the connections broke.   The connection coming out of the tank and going to the fuel separator snapped off.  My tank appears to be slightly different then the pic as the line seems to go right into the tank, and not into the fuel shutoff valve, but I imagine it does the same thing. 

But my question is will it still run with out it connected, and do you think I could tap it and replace it with a nipple of some sort, or some other substitute, i.e. jbweld?  Thanks!

Here's a highlighted pic of what I'm talking about it snapped at the red high lighted section.


*

Offline Bryce132

  • 117
  • 0
Re: Removed my bumper cover and found a nightmare! - Some progress & more pics
« Reply #11 on: December 15, 2009, 06:42:43 PM »
Hey,

I had to do the same thing with my tracker, except about 4x worse i know what its like~!!!
Looks good though, i used  box tubing for mine. Now is the PERFECT time to lift the gas tank as well.

Bryce

*

Offline hegemon

  • 112
  • 4
  • Gender: Male
Re: Removed my bumper cover and found a nightmare! - Some progress & more pics
« Reply #12 on: December 17, 2009, 08:41:55 AM »
Thanks Bryce, I actually referenced your thread and pics prior to diving into the work.  I would probably would have used box tubing as well as it's more accessible, but I had the dom tubing laying around, which worked out nice.

What did you end up doing to reconnect the body to the frame, as you can see that area is pretty much shot.  What I found was really the only structural portion is the actual body mounts, there appears to be a reinforced 'L' bracket welded in place.  I plan to make my own 'L' brackets, for the body mounts, then sand/seal the what's left of the usable metal, and close it back in we sheet metal.  My sheet metal skills aren't so hot, so I'm not sure how's it's going to work out.

*

Offline hegemon

  • 112
  • 4
  • Gender: Male
Re: Removed my bumper cover and found a nightmare! - Update with pics
« Reply #13 on: March 02, 2010, 09:35:13 AM »
So I finally found time to do some more work on the rear section of the body.  At this point the frame has been repaired, body sections rebuilt, and the gas tank lifted and installed.  Here are some pics of the process...

Here's the center section of the rear body, this was obviously the easiest part, couple simple bends and it was done.


Left and Right Corners, the inside bends were a pain, considering my english wheel is just a hammer and 2" receiver ball.


Here's the outside corner, it was simple enough to wrap the sheet metal around the natural body lines.


Here's a shot of it all welded up and then primed.  I plan to go over it with a skim coating of kitty hair fiberglass to smooth it all out.


I also lifted the gas tank.  Used about 6 washers on each reach mount to level the tank.


And finally it's all back together, I picked up a set of 31" tires and rims, I have some minor rubbing on the inside corner of the fender, I just need to smack it with a hammer and it should be good though.


« Last Edit: March 03, 2010, 07:25:25 AM by hegemon »

*

Offline Drone637

  • *
  • 8121
  • 116
  • Gender: Male
  • Evil Cow
Re: Removed my bumper cover and found a nightmare! - Update & more pics
« Reply #14 on: March 02, 2010, 03:46:23 PM »
Nice work!  Solid project from start to finish.
96 Geo Tracker, x-SJ-410,  x-White Rabbit, x-Project Trouble
Crawlers NorthWest
x-Trouble Racing