Hello Guest

Rudy - The White Beast

  • 61 Replies
  • 17139 Views

0 Members and 9 Guests are viewing this topic.

*

Offline talonxracer

  • 1284
  • 34
Re: Rudy - The White Beast
« Reply #15 on: July 06, 2011, 09:25:48 AM »
VERY nice job on the frame!

I am not going as far down the restoration path ATM as you are, I do plan on snagging a frame to do a complete frame restoration and possibly a new tub from down in the Southwest next summer.

You should be able to get dry ice at most any welding supply shop, also there is a national dry ice directory on line that can provide a list of any and all local suppliers. I bought 20lbs and had about 6 lbs left over doing a Honda Civic interior.

I placed the dry ice in a gallon ziplock bag, placed the bag between two 2x10's and walloped it repeatedly with a small sledge to make dryice snow.
« Last Edit: July 06, 2011, 09:28:39 AM by talonxracer »
Tim "the toolman" Taylor is my HERO !!!

The only GOOD Commie is the commie taking a dirt nap....

*

Offline TheZuke

  • 38
  • 1
  • Gender: Male
Re: Rudy - The White Beast
« Reply #16 on: July 06, 2011, 12:13:01 PM »
VERY nice job on the frame!

I am not going as far down the restoration path ATM as you are, I do plan on snagging a frame to do a complete frame restoration and possibly a new tub from down in the Southwest next summer.

You should be able to get dry ice at most any welding supply shop, also there is a national dry ice directory on line that can provide a list of any and all local suppliers. I bought 20lbs and had about 6 lbs left over doing a Honda Civic interior.

I placed the dry ice in a gallon ziplock bag, placed the bag between two 2x10's and walloped it repeatedly with a small sledge to make dryice snow.


Thanks!  I know, I'm going a little too far for something that will not even make it to the highway on our 10km of gravel without getting dirty but, maybe I'm a little OCD.  Not to mention that the Body is rusting into despair.

When I finally decided that I wanted to sandblast the frame I realized that the fuel lines and brake line would be better off if I removed them.  After busting 1/2 of the little plastic clips I thought that maybe I was in over my head but, a trip to the wreckers later I procured some new clippies.  These lines were also covered in the undercoating so I disassembled them and used paint thinner,a rag, a toothbrush and elbow grease to scrub the crud off.  Now I have freshly exposed lines ready to be covered in mud.


Installing new wheel bearings into the hub.  Note, install wheel studs first because pressing studs in after the bearings are installed introduces opportunities for dirt to get on everything.


« Last Edit: July 07, 2011, 07:05:17 PM by TheZuke »
1990 Sidekick "The Zuke"  3/4" coil spacers, 33" tires and fender trimmin' to make em fit.  Not to mention all of the other trimmin'
1991 Sidekick "Rudy" Stock

*

Offline muskegtracker

  • 273
  • 10
  • Gender: Male
  • Mr T
Re: Rudy - The White Beast
« Reply #17 on: July 06, 2011, 10:25:33 PM »
Those are some clean lines. Keep up the excellent work. Speed it up too!
91 Chevy Tracker
2.7L V6, Coil-over Suspension, ARB, and other goodies...
My build - http://www.zukiworld.com/forum/index.php?topic=25353.0

*

Offline djlantis57

  • 871
  • 13
  • Gender: Male
  • Take your chrome home
Re: Rudy - The White Beast
« Reply #18 on: July 07, 2011, 01:06:16 AM »
So what exactly is this POR-15 I keep reading about on here?  You can apply it directly to rusted metal? Does it work better to prep the surface like regular paint or just slather it on? Might use this for the little project trailer
God put me on earth to accomplish a certain number of things.  Right now I am so far behind, I will never die.
90 Tracker LSi 2dr tintop 5spd: slow toy . . . . . . . . . . . . . . . 08 Pontiac G8 GT: fast toy
90 Tracker LSi 2dr 5spd: SOLD.......95 Tracker 2dr 5spd: parts..........90 Sidekick JX 5spd: HI, my name's DJ and I have an addiction.........93 Tracker 2dr 2wd 5spd: PS donor/poss. 4x4 swap from 95 parts

*

Offline talonxracer

  • 1284
  • 34
Re: Rudy - The White Beast
« Reply #19 on: July 07, 2011, 08:30:06 AM »
POR15 is a sealant paint that is applied over rust and it stops it from further rusting.

Very few people that I know actually have used the POR15, but instead use Chassis-Saver(which I personally prefer and use). To use the ChassisSaver you use a wire brush to remove rust scale(but not down to clean metal) and brush it on, i assume POR15 will be the same general procedure. 
« Last Edit: July 07, 2011, 08:34:16 AM by talonxracer »
Tim "the toolman" Taylor is my HERO !!!

The only GOOD Commie is the commie taking a dirt nap....

*

Offline kreator

  • 634
  • 15
  • Gender: Male
Re: Rudy - The White Beast
« Reply #20 on: July 07, 2011, 08:32:55 AM »
Dude looks like everything rust bad there , I thought that oregon was bad at the coast , they must salt the roads for winter  :)
BOB | www.KreationFab.com | 503-689-1377

*

Offline TheZuke

  • 38
  • 1
  • Gender: Male
Re: Rudy - The White Beast
« Reply #21 on: July 10, 2011, 10:58:46 AM »
So what exactly is this POR-15 I keep reading about on here?  You can apply it directly to rusted metal? Does it work better to prep the surface like regular paint or just slather it on? Might use this for the little project trailer

Dido talonxracer's reply
POR15 is a sealant paint that is applied over rust and it stops it from further rusting.

Very few people that I know actually have used the POR15, but instead use Chassis-Saver(which I personally prefer and use). To use the ChassisSaver you use a wire brush to remove rust scale(but not down to clean metal) and brush it on, i assume POR15 will be the same general procedure. 

I like how POR 15 has worked so far but I have not really put it to the test of time yet.  I poured it into a yogurt container and when it dried I pulled it out in one piece.  There was one spot that was quite thick (cereal box cardboard thickness) and when I tried to tear it with my hands I couldn't and it wouldn't crack when I bent it back and forth.  It is however, disappointingly enough not UV resistant and there fore needs to be top coated.  I painted a piece of pipe about 3 months ago and it has been outside since and the paint is already failing.  Hopefully, that makes sense.
1990 Sidekick "The Zuke"  3/4" coil spacers, 33" tires and fender trimmin' to make em fit.  Not to mention all of the other trimmin'
1991 Sidekick "Rudy" Stock

*

Offline talonxracer

  • 1284
  • 34
Re: Rudy - The White Beast
« Reply #22 on: July 10, 2011, 11:50:45 AM »
The chassis saver only changes color due to UV, the black turns grey, but it doesnt alter it's physical properties or protection.
Tim "the toolman" Taylor is my HERO !!!

The only GOOD Commie is the commie taking a dirt nap....

*

Offline tuxblacray

  • 930
  • 20
  • Gender: Male
  • Building a Bigger Better Brute Samurai.... B-}
    • Tuxblacray Photos
Re: Rudy - The White Beast
« Reply #23 on: July 10, 2011, 04:00:07 PM »
just a quick word on the use of dry ice. I worked in a manufacturing industry for 32 years. we would be dry ice to clean machines with. Dirty grimey, oily, nasty bad I don't wanna touch that thing kinda machine. We would spray dry ice on them and feeze the crap off of the machine and then blow it off with high air pressure. It worked great! 

Your work on the Zuk looks GREAT... but COLD! I guess ya gotta take the good with the bad to see results!!!  :laugh:
I know the voices aren't real.... but they have some pretty kewl ideas!!! Tux.....  ;-)
I get my Sammi parts here, and you can too... http://www.mikodaindustries.com/http://stores.ebay.com/sticksnstones4x4samuraiparts

*

Offline TheZuke

  • 38
  • 1
  • Gender: Male
Re: Rudy - The White Beast
« Reply #24 on: July 13, 2011, 06:04:46 PM »

Your work on the Zuk looks GREAT... but COLD! I guess ya gotta take the good with the bad to see results!!!  :laugh:


Thanks, the Zuke is fun and not bad in the cold.  It is the mud that really presents a fun angle.  Unless you don't like mud.  I don't really like mud.

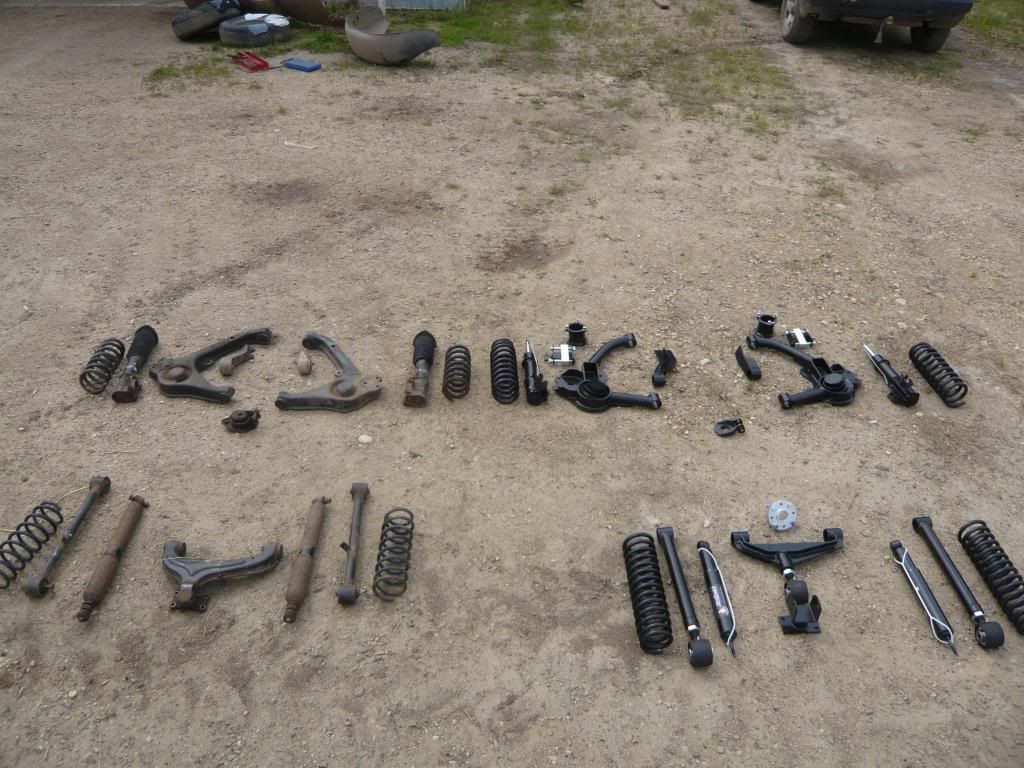
Well, I have been busy but, the camera doesn't always follow me to the shop.  I did take some comparison pictures of the zukination alter-ego lift with the stock set up.  When I opened the boxes, there were a couple of components included that I felt were unnecessary but with everything installed it seems to be OK.


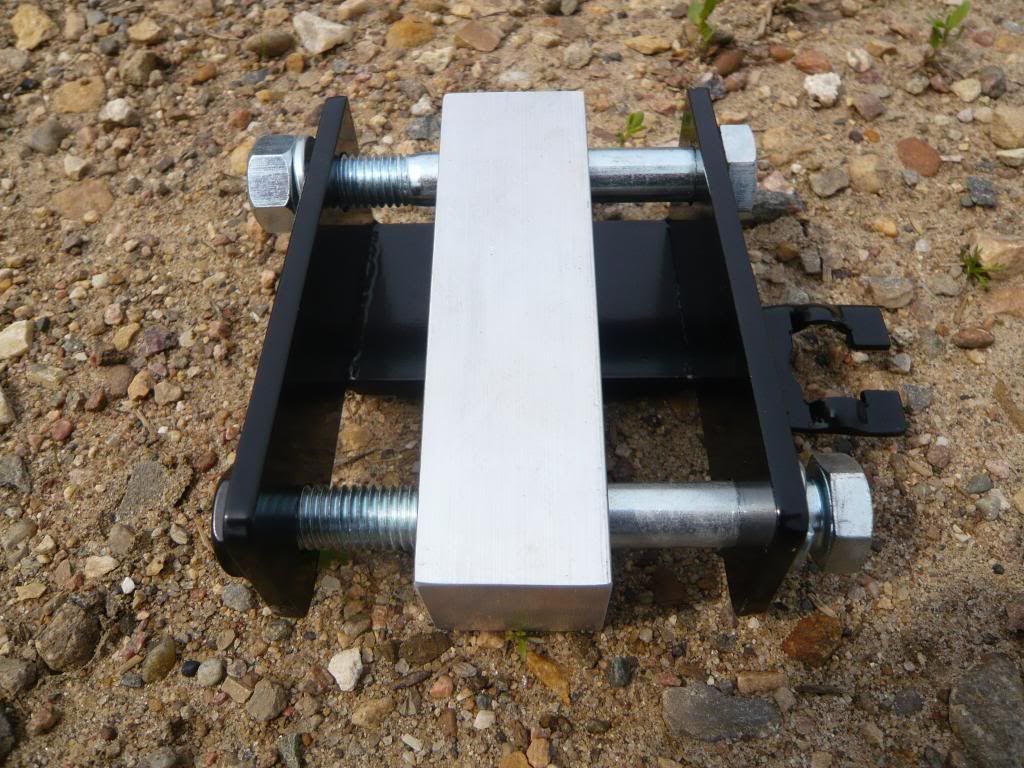
This little piece below is one of the items that I initially felt was unnecessary.  They call it an upper knuckle relocation bracket (or something to that effect).  The aluminum block goes in the strut where the knuckle would normally go and then the knuckle gets sandwiched to the front of the strut.  It's main purpose is to correct the caster.  Since the ball joint is moved forward, then they figure that the top of the knuckle should move forward and this is the easiest way to do that without moving the whole strut forward.  Savvy.  

When, you break it down, a line drawn through the strut in it's stock location passes through the outer CV joint and then through the balljoint.  With the knuckle moved forward and the strut sandwiched behind it, this line now passes behind the CV joint.  Since I was installing this on a bare frame, it was very easy to see the effects.  When the spindle is turned from side to side, you can also see that this rotational movement of the top of the knuckle causes the CV to plunge in and out.  Also, the strut swings in a funky arc.  I called Geoff and asked him about not using it and he said that vehicles he has run that without relocating the knuckle have vibration???  I know that Muskegtracker moved his lower balljoint forward 2 inches or so and noticed no vibrations.  Maybe the combination of the lift and everything......  Well, in the long run I decided to use the bracket mainly because it allows for more camber adjustment due to the offset of the holes in the aluminum.  You still have to slot the upper strut hole but without it, you would also have to remove material on the knuckle between the strut and the top hole of the knuckle as it would bottom out on the body of the strut before the proper camber was achieved. Sorry, a picture would make more sense but alas.

With all of that said, if caster was the real issue, I would like to see a strut relocation bracket/strut spacer that moves the whole strut forward with the knuckle thus negating the need for said upper knuckle relocation bracket.  I would also like to see it moved to a location that compensated for camber too.  If you have to make a spacer, it just as well do something.  To their credit, their spacer is offset a little.  I'm guessing it makes up for the rest of the difference that the thickness of the knuckle does not.  I'm sure that this makes no sense to anyone but me but I trying.


Now, with all of that said, my dad owns a sunrunner that we ordered a lift for at the same time.  The lift is installed and it handles like a dream.  It is relatively smooth through the fields and washboards and has gobs of articulation.  

I also wish that the lift came with a little more new hardware.  It came with all new bolts for the rear lower links (4 in total) but nothing for the front of the 3rd link (the creeper joint comes with a 9/16 bolt), the control arms, or the shocks.  In our country, all of theses bolts required a little liquid wrench to be removed as they seize in the sleeves of the bushings.  A few bolts are by no means a deal breaker but it does make the lift a little more complete.

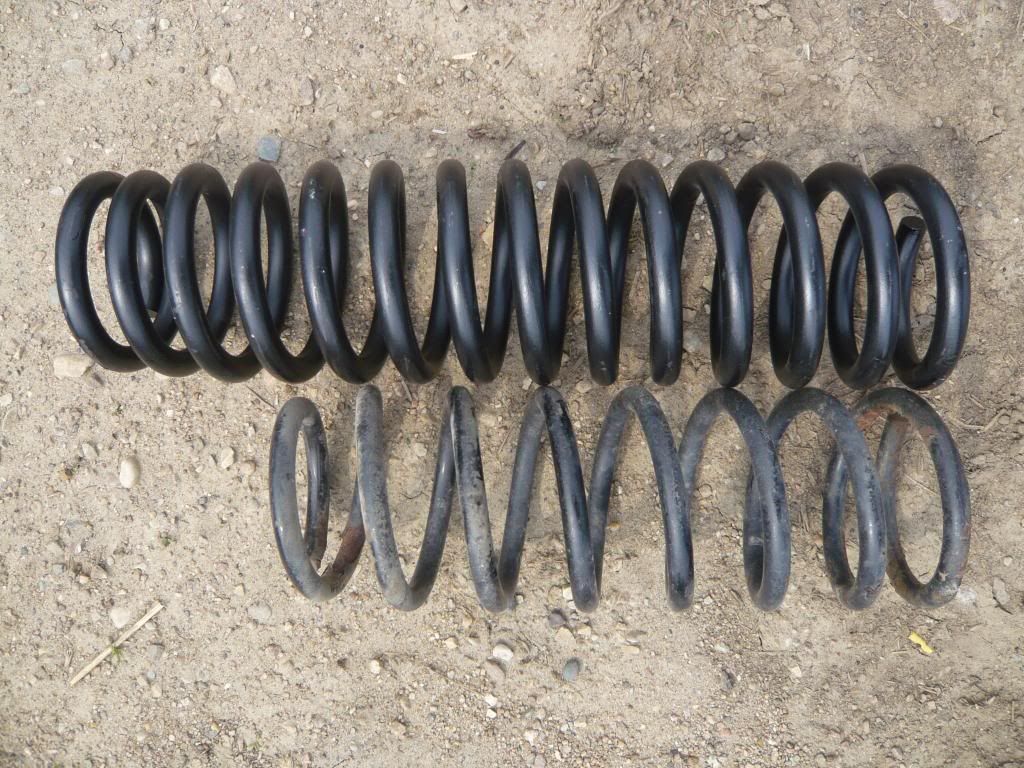
Rear Springs


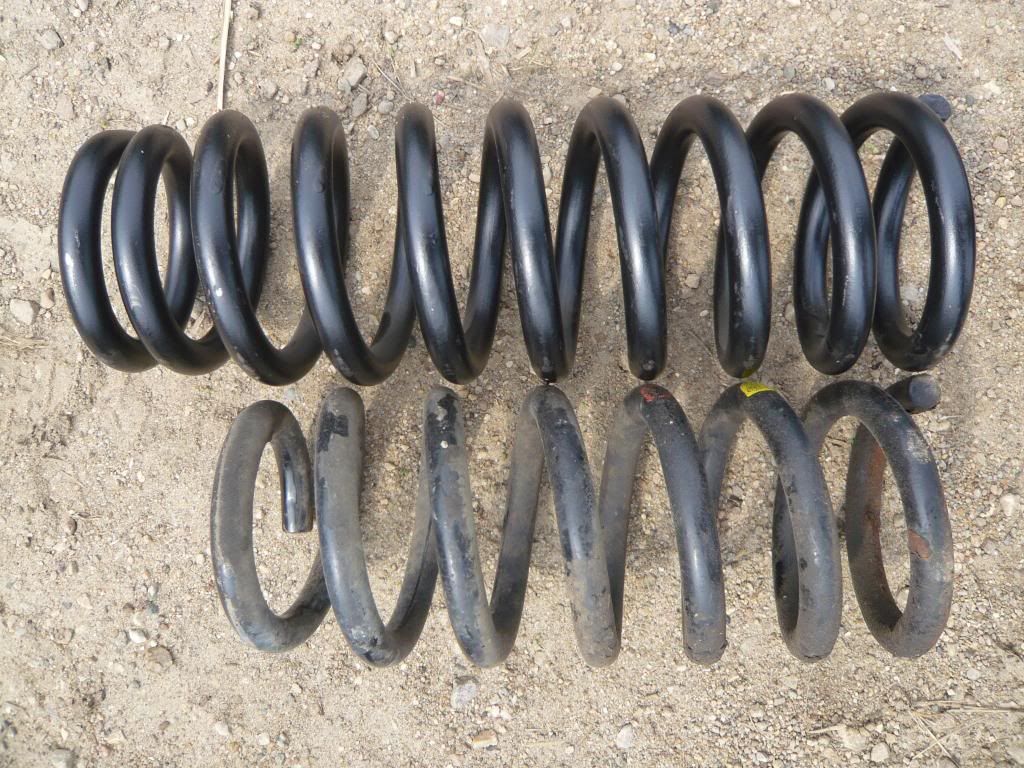
Front springs


Diff drop Brackets
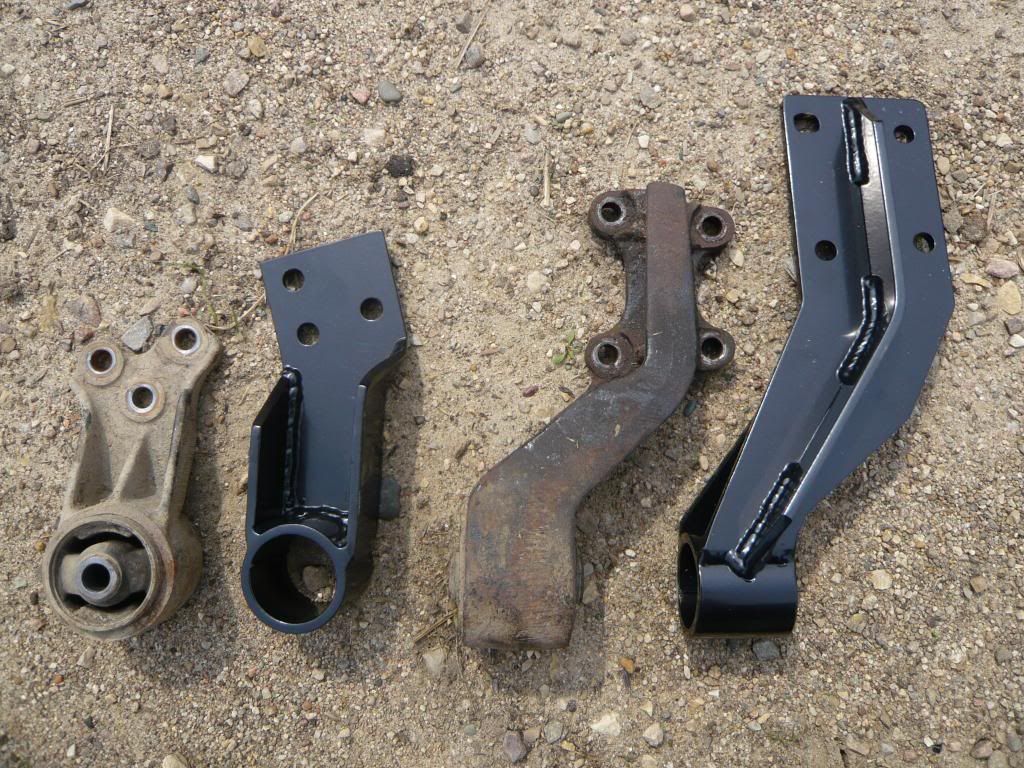


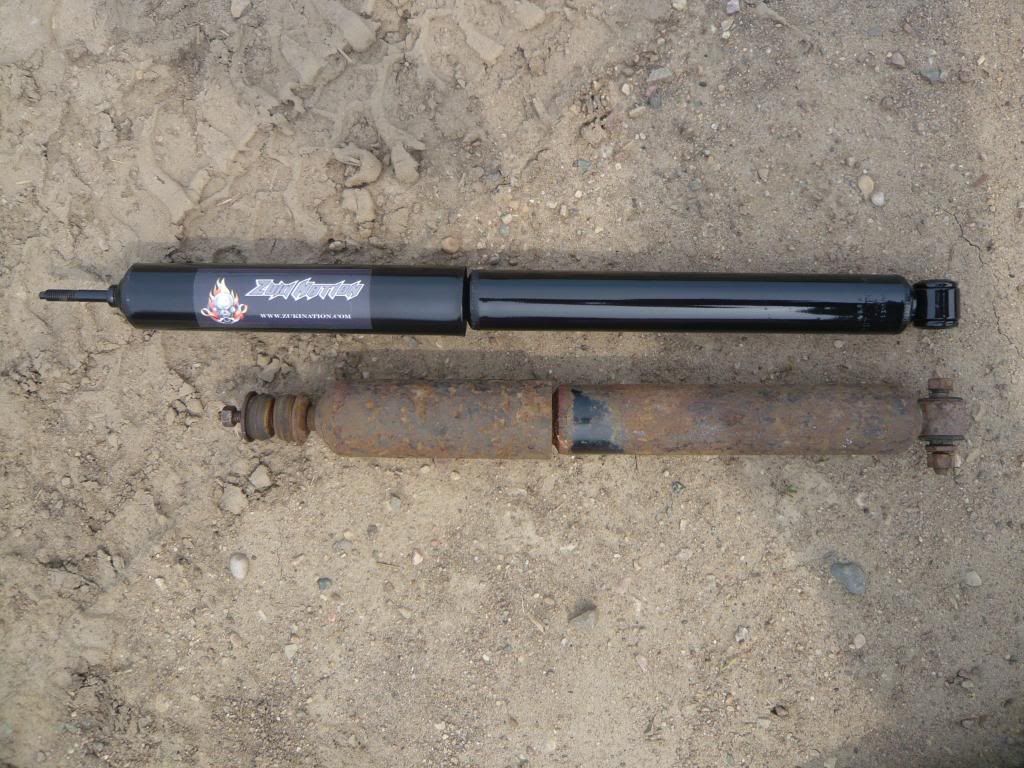
Not sure what shocks these are but they are long.  So long in fact, the springs have about 1.5inches of room on full droop.  Not quite enough to fall out or off of the perches but they do flop around when given the freedom.


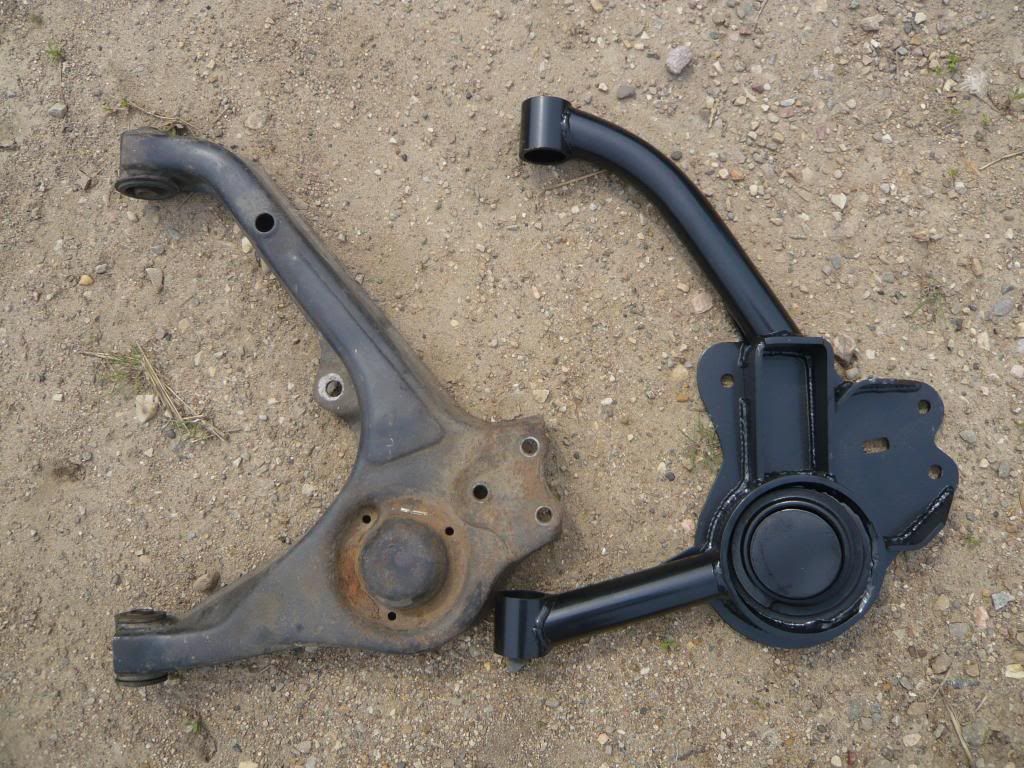
Control arms.  Self explanatory.  Balljoint moves forward 1.5 inches with some lift built into the control arms.  One qualm I do have with the control arms is you do lose turn radius as the caliper will actually hit the spring on full lock.  The rim will also hit the control arm if you are using stock rims.  Not an issue if you are using big tires because they will probably hit the frame at around the same time.  The steering stops have to be extended almost all of the way to avoid the calipers hitting the springs.  In fact, on my application, the stops are not long enough.
« Last Edit: July 13, 2011, 06:08:53 PM by TheZuke »
1990 Sidekick "The Zuke"  3/4" coil spacers, 33" tires and fender trimmin' to make em fit.  Not to mention all of the other trimmin'
1991 Sidekick "Rudy" Stock

*

Offline talonxracer

  • 1284
  • 34
Re: Rudy - The White Beast
« Reply #25 on: July 13, 2011, 06:17:32 PM »
nice pic's

Your removed parts are at least useable, I had to cut mine out! LOL
Tim "the toolman" Taylor is my HERO !!!

The only GOOD Commie is the commie taking a dirt nap....

*

Offline bentparts

  • *
  • 4536
  • 60
  • Gender: Male
  • I'd rather be Blown AND Injected.
    • mikekallie's flickr photos
Re: Rudy - The White Beast
« Reply #26 on: July 13, 2011, 08:34:59 PM »
Now I have freshly exposed lines ready to be covered in mud.  :laugh:
 I hear ya. But it easier to maintain in the long run if you start fresh. Now keeping it clean, that's the real hard part. I've found that rubberized stuff that came on a lot of em stock, is actually pretty good at keeping the parts from rusting. PITA to have to remove to weld around and such, but now that I got that dry ice tip I'll never scrape that crap again. Thanks guys.  ;)


The usual stuff, and 2nd generation Air to liquid intercooled TURBOCHARGER

*

Offline bentparts

  • *
  • 4536
  • 60
  • Gender: Male
  • I'd rather be Blown AND Injected.
    • mikekallie's flickr photos
Re: Rudy - The White Beast
« Reply #27 on: July 13, 2011, 08:48:32 PM »
The chassis saver only changes color due to UV, the black turns grey, but it doesnt alter it's physical properties or protection.

every couple of cleanings, especially after paticularly wet and muddy runs, I'll clean the chassis and fender wells real good, and use the same stuff I use to treat my sidewalls to treat any easily reachable part of the cassis and fenderwells that's covered with any kind of paint or undercoating. Just squeeze a dollap on a piece of sponge, I use a lot of recycled packing materials for this, and slather on anything you can reach. The slicker surface makes it harder for dirt and mud to stick, and it washes off easier when it does stick. Not only does it make it look all nice and clean, it helps keep it that way. I firmly believe that a well maintained rig tends to actually stay cleaner because of the surface treatments. Looks cool too. 8)
The usual stuff, and 2nd generation Air to liquid intercooled TURBOCHARGER

*

Offline TheZuke

  • 38
  • 1
  • Gender: Male
Re: Rudy - The White Beast
« Reply #28 on: July 15, 2011, 12:35:05 PM »
I've found that rubberized stuff that came on a lot of em stock, is actually pretty good at keeping the parts from rusting. PITA to have to remove to weld around and such, but now that I got that dry ice tip I'll never scrape that crap again. Thanks guys.  ;)


Rudy (the sidekick) actually has the rubberized stuff on it with an additional layer of asphalt undercoating on top.  I was doing a little rust hole welding on the body yesterday and this stuff would burn like kerosene.  Once ignited, burning gobs of tar would drip to the ground while continuing to burn.  The fact that the threads of the bolts were all covered in this stuff could be the reason I only had to use the angle grinder to cut off one lower links.

1990 Sidekick "The Zuke"  3/4" coil spacers, 33" tires and fender trimmin' to make em fit.  Not to mention all of the other trimmin'
1991 Sidekick "Rudy" Stock

*

Offline talonxracer

  • 1284
  • 34
Re: Rudy - The White Beast
« Reply #29 on: July 15, 2011, 03:55:21 PM »
A discovery today,

While I was laying under the vehicle wiping some of the excess antisieze off, making youthfull engine noises and climbing imaginary mtns I pulled on the A-arm and it moved almost a quarter of an inch and thunked!

I knew immediatly what was happening, the a-arm's bushing were too short and the crush sleeve/center bushing was the correct length, thusly when the bushings were all greased up the A-arm could slide back and forth on the center bushing. I made a quick trip to the parts bin and found 8 large washers with a center hole of 3/4" to go over the center bushing, they fit perfectly and the A-arm has no movement, the washers will also help keep debris and stuff out of the bushings and they should last far longer. (crappy pic, macro feature screwed up on the camera, but ya get the idea) This is done to both the front and rear bushings on the a-arm. The washers are the gold colored parts between the outside of the poly bush and the frame Bracket.
« Last Edit: July 15, 2011, 04:11:41 PM by talonxracer »
Tim "the toolman" Taylor is my HERO !!!

The only GOOD Commie is the commie taking a dirt nap....